Custom Image Templates part 2
Streamlining Azure Virtual Desktop deployment with Custom Image Templates part 2
In this blog Custom Image Templates part 2, we are looking into the possibilities of using predefined scripts for Azure Image Templates. I will show the various approaches available, using the Azure Portal or Infrastructure as Code solutions using Bicep. With a few examples i will highlight how to create the image template in both scenarios and which route i prefer.

Predifined scripts that can be used in and Custom Images
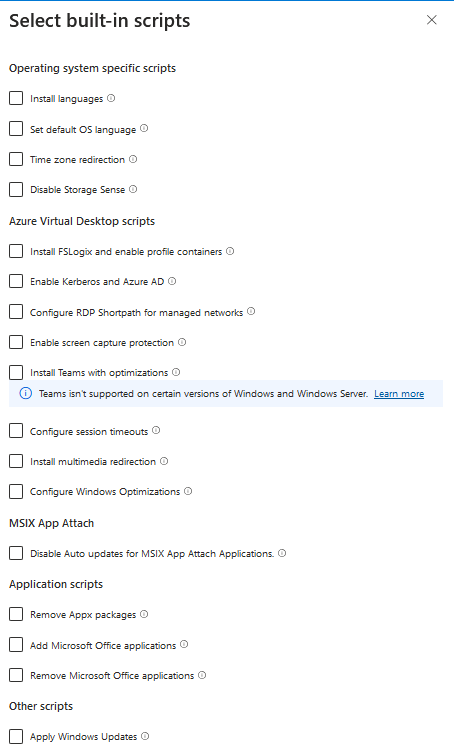
Creating a custom image for your virtual environment allows you to configure the operating system and applications to meet specific requirements. Custom Images gives you also the abbility to create and deploy custom scripts, but have some preconfigured scripts as wel. Below are a few examples of the options you can select during the creation of a custom image:
Install language packs
Add additional language packs to the operating system to support multilingual environments.Set the default language of the operating system
Define the primary language used for the OS interface.Enable time zone redirection
Allow applications to adjust to the user’s local time zone automatically.Install FSLogix and configure Profile Container
Set up FSLogix to manage user profiles efficiently and improve session performance.Enable RDP Shortpath for managed networks
Optimize Remote Desktop Protocol (RDP) performance in managed network environments.Enable screen capture protection
Prevent unauthorized screen captures to enhance security.Configure Teams optimizations
Enhance Microsoft Teams performance with features like the WebRTC redirector service and Visual C++ Redistributable.Apply Windows Updates
Ensure the operating system is up-to-date with the latest Windows updates during the image creation process.
These are just a few examples of the many configurations available when creating a custom image, documentation can found in this article:
What do we need to do when we are using the Azure Portal:
- Go to the Azure Virtual Desktop section in the Azure Portal and choose Custom Image Template

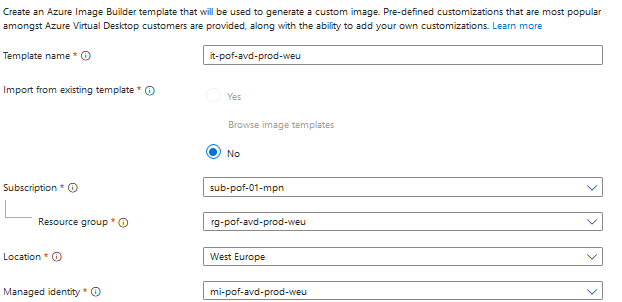
- Give your template a name and fill in the Resource Group, Location and Managed Identity

- Fill in the source of your template and image

- Fill in the source of your template and image

- Fill in the destination where the image needs to be stored

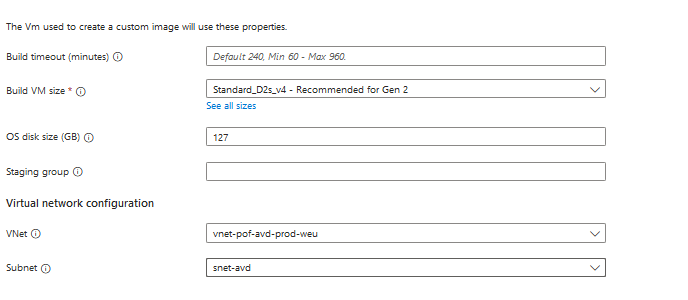
- If you want a custom specified virtual network and want to choose the installation VM

- And for the customization you can fill in the scripts you want to add in the template

- Finally! you can create the image template
So in this example i only higlighted the creation of the Image Template. As you can see in the screenshots, you need to make the other needed resources "resource group, azure compute gallery and managed identity' beforehand, because you are obliged to add them in the deployment of the image template. You can imagine how much time it can safe when you are doing this the automated way using IaC and reusable code, so lets jump to the next section.
Why do you want to deploy these resources using Infrastructure as Code
First of all, why do you want to deploy resources using Infrastructure as code? Well here is my answer, deploying resources using Infrastructure as Code provides several benefits, including efficiency, consistency, and scalability. If you want to create the template multiple times for different customers or solution you can make your code reusable and use it multiple times.
Lets zoom in a little bit further in the bicep modules, which resources are we going to deploy and ofcourse do some deepdiving in the Custom Image Template module.
In this case we are using Bicep, the resources listed below are needed:
- Resource Group
- Managed Identity
- Azure Compute Gallery
- Image Template
You can find these resources in my GitHub repository: Bicep Image Automation image template
Explanation of the Image Template in bicep
We are using the Azure Verified Modules for Bicep to build the infrastructure, I will explain more about Azure Verified Modules in the my upcoming blogs. I will dig a little bit deeper in the Image Template module which i create in my imagetemplate.bicep
This is the module CreateImageTemplate in my imagetemplate.bicep
 1module createImageTemplate 'br/public:avm/res/virtual-machine-images/image-template:0.4.0' = {
 2  scope: resourceGroup(resourceGroupName)
 3  name: 'it-${deploymentGuid}'
 4  params: {
 5    name: imageTemplateName
 6    location: location
 7    customizationSteps: [
 8      {
 9        restartTimeout: '10m'
10        type: 'WindowsRestart'
11      }
12      {
13        destination: 'C:\\AVDImage\\enableFslogix.ps1'
14        name: 'avdBuiltInScript_enableFsLogix'
15        sha256Checksum: '027ecbc0bccd42c6e7f8fc35027c55691fba7645d141c9f89da760fea667ea51'
16        sourceUri: 'https://raw.githubusercontent.com/Azure/RDS-Templates/master/CustomImageTemplateScripts/CustomImageTemplateScripts_2024-03-27/FSLogix.ps1'
17        type: 'File'
18      }
19      {
20        inline: [
21          'C:\\AVDImage\\enableFslogix.ps1 -FSLogixInstaller "https://aka.ms/fslogix_download" -VHDSize "30000" -ProfilePath "\\test\\test\\"'
22        ]
23        name: 'avdBuiltInScript_enableFsLogix-parameter'
24        runAsSystem: true
25        runElevated: true
26        type: 'PowerShell'
27      }
28      {
29        name: 'avdBuiltInScript_adminSysPrep'
30        runAsSystem: true
31        runElevated: true
32        scriptUri: 'https://raw.githubusercontent.com/Azure/RDS-Templates/master/CustomImageTemplateScripts/CustomImageTemplateScripts_2024-03-27/AdminSysPrep.ps1'
33        sha256Checksum: '1dcaba4823f9963c9e51c5ce0adce5f546f65ef6034c364ef7325a0451bd9de9'
34        type: 'PowerShell'
35      }
36    ]
37    imageSource: {
38      offer: offerName
39      publisher: publisherName
40      sku: skuVersion
41      type: 'PlatformImage'
42      version: 'latest'
43    }
44    tags: tags
45
46
47    distributions: [
48      {
49        type: 'SharedImage'
50        sharedImageGalleryImageDefinitionResourceId: createSharedImageGallery.outputs.imageResourceIds[0]
51        sharedImageGalleryImageDefinitionTargetVersion: sigImageVersion
52      SW
53      }
54    ]
55
56
57
58    managedIdentities: {
59      userAssignedResourceIds: [
60        userAssignedManagedIdentity.outputs.resourceId
61      ]
62    }
63  }
64  dependsOn: [createSharedImageGallery, createResourceGroup]
65}
In this customazation we will install, enable and configure some register settings for FSlogix You will see some locations pointing to the script as well as some inline commands to add some arguments to the script.
'https://raw.githubusercontent.com/Azure/RDS-Templates/master/CustomImageTemplateScripts/CustomImageTemplateScripts_2024-03-27'
'C:\\AVDImage\\enableFslogix.ps1 -FSLogixInstaller "https://aka.ms/fslogix_download" -VHDSize "30000" -ProfilePath "\\fslogix\\profile\\"'
 1
 2
 3customizationSteps: [
 4      {
 5        restartTimeout: '10m'
 6        type: 'WindowsRestart'
 7      }
 8      {
 9        destination: 'C:\\AVDImage\\enableFslogix.ps1'
10        name: 'avdBuiltInScript_enableFsLogix'
11        sha256Checksum: '027ecbc0bccd42c6e7f8fc35027c55691fba7645d141c9f89da760fea667ea51'
12        sourceUri: 'https://raw.githubusercontent.com/Azure/RDS-Templates/master/CustomImageTemplateScripts/CustomImageTemplateScripts_2024-03-27/FSLogix.ps1'
13        type: 'File'
14      }
15      {
16        inline: [
17          'C:\\AVDImage\\enableFslogix.ps1 -FSLogixInstaller "https://aka.ms/fslogix_download" -VHDSize "30000" -ProfilePath "\\fslogix\\profile\\"'
18        ]
19        name: 'avdBuiltInScript_enableFsLogix-parameter'
20        runAsSystem: true
21        runElevated: true
22        type: 'PowerShell'
23      }
24      {
25        name: 'avdBuiltInScript_adminSysPrep'
26        runAsSystem: true
27        runElevated: true
28        scriptUri: 'https://raw.githubusercontent.com/Azure/RDS-Templates/master/CustomImageTemplateScripts/CustomImageTemplateScripts_2024-03-27/AdminSysPrep.ps1'
29        sha256Checksum: '1dcaba4823f9963c9e51c5ce0adce5f546f65ef6034c364ef7325a0451bd9de9'
30        type: 'PowerShell'
31      }
32    ]
It is possible to use your own scripting, if you want to use it you need to store them in a storage account or a external source where you can acces them. It's the same way as the predefined script you see in the above examples.
- For the imageSource you can pick an OS version you want to customize there are no bounderies. You can specify this the preferred way using a bicepparam file to add in the values.
- For the distribtion you point to the Azure Compute Gallery and the created Image Definition in the Azure Compute Gallery, this will be created in the imagetemplate.bicep as well.
- You connect the managed identity as well and this is also created in the imagetemplate.bicep, it will be used to store the image in the image gallery.
 1imageSource: {
 2      offer: offerName
 3      publisher: publisherName
 4      sku: skuVersion
 5      type: 'PlatformImage'
 6      version: 'latest'
 7    }
 8    tags: tags
 9
10
11    distributions: [
12      {
13        type: 'SharedImage'
14        sharedImageGalleryImageDefinitionResourceId: createSharedImageGallery.outputs.imageResourceIds[0]
15        sharedImageGalleryImageDefinitionTargetVersion: sigImageVersion
16
17      }
18    ]
19
20
21
22    managedIdentities: {
23      userAssignedResourceIds: [
24        userAssignedManagedIdentity.outputs.resourceId
25      ]
26    }
The rest of the needed resources in bicep
In the imagetemplate.bicep there are three needed resources to make this deployment a success:
Resource Group
1  module createResourceGroup 'br/public:avm/res/resources/resource-group:0.4.0' = {
2  scope: subscription(subscriptionId)
3  name: 'rg-${deploymentGuid}'
4  params: {
5    name: resourceGroupName
6    location: location
7    tags: tags
8      }
9  }
Managed Identity
 1  module userAssignedManagedIdentity 'br/public:avm/res/managed-identity/user-assigned-identity:0.3.0' = {
 2  scope: resourceGroup(resourceGroupName)
 3  name: 'id-${deploymentGuid}'
 4  params: {
 5    name: userAssignedManagedIdentityName
 6    location: location
 7    tags: tags
 8
 9  }
10  dependsOn: [createResourceGroup]
11}
Azure Compute Gallery
 1  module createSharedImageGallery 'br/public:avm/res/compute/gallery:0.7.0' = {
 2  scope: resourceGroup(resourceGroupName)
 3  name: 'gal-${deploymentGuid}'
 4  params:{
 5    name:azureSharedImageGalleryName
 6    location: location
 7    images: [
 8      {
 9        name: imagesSharedGalleryName
10        identifier: {
11          publisher: publisherName
12          offer: offerName
13          sku: skuVersion
14        }
15        osType: 'Windows'
16        osState: 'Generalized'
17        hyperVGeneration: 'V2'
18        securityType: 'TrustedLaunch'
19
20      }
21    ]
22
23    roleAssignments: [
24      {
25        roleDefinitionIdOrName: 'b24988ac-6180-42a0-ab88-20f7382dd24c'
26        principalId: userAssignedManagedIdentity.outputs.principalId
27        principalType: 'ServicePrincipal'
28      }]
29    tags: tags
30
31  }
32  dependsOn: [createResourceGroup]
33  }
And to deploy this you can use the imagetemplate.bicepparam to fill in your environment variables:
 1using 'imagetemplate.bicep'
 2
 3
 4//parameters for the deployment.
 5param updatedBy = 'yourname'
 6param subscriptionId = 'yoursubscriptionid'
 7param environmentType = 'prod'
 8param location = 'westeurope'
 9param locationShortCode = 'weu'
10param productType = 'avd'
11
12///Paremeters for the SKU version.
13param skuVersion = '2022-datacenter-azure-edition-hotpatch'
14param publisherName = 'MicrosoftWindowsServer'
15param offerName = 'WindowsServer'
16
17//Parameters for the Shared Image Gallery.
18param sigImageVersion = '1.0.0'
19param azureSharedImageGalleryName = 'gal${productType}${environmentType}${locationShortCode}'
20
21//Parameters for the Image Template.
22param imageTemplateName = 'it-${productType}-${environmentType}-${locationShortCode}'
23param imagesSharedGalleryName = 'img-${productType}-${environmentType}-${locationShortCode}'
24
25//Paremeters for the Managed Identity.
26param userAssignedManagedIdentityName = 'mi-${productType}-${environmentType}-${locationShortCode}'
Listed below are the commands you can use to list your favorite image sku's which you can use in the bicepparam file.
Get-AzVMImageSku -Location westeurope -PublisherName MicrosoftWindowsServer -Offer WindowsServer | Select Skus
Get-AzVMImageSku -Location westeurope -PublisherName MicrosoftWindowsDesktop -Offer office-365 | Select Skus
For now, if you want to test these resources you can use the following command to deploy the .bicep in combination with the .bicepparam file, make sure you have added your own values in the bicepparam file as wel such as the subscriptionId
az deployment sub create --name imagedeployment --location westeurope --template-file imagetemplate.bicep --parameters imagetemplate.bicepparam
Make sure you are running this command in the same location as where you have stored your files and that you are logged in to the environment using az login
Which method do we want to use?
As you can see in this blogpost, using the Azure Portal offers an intuitive interface for configuring resources, but it can be time-consuming and prone to manual errors, especially for repeated deployments. By leveraging Infrastructure as Code, users can automate and reuse deployment processes. Deploying resources with Azure Bicep, brings consistency, reusability and scalability. Your environment becomes significantly more efficient when using Infrastructure as Code.
Don't get me wrong the Azure Portal is an excellent way to create resources for the first time. However, to maintain control over multiple deployments and environments, the use of Infrastructure as Code (IaC) is essential.
In Part 3, we will deploy the Bicep templates using different methods and of course build the image for the Azure Virtual Desktop.